Dougherty L, Lister S. The Royal Marsden Hospital manual of clinical nursing procedures, 9th edn. Chichester: John Wiley and Sons; 2015
European Biosafety Network. Prevention of sharps injuries in the hospital and healthcare sector. Implementation guidance for the EU Framework Agreement, Council Directive and associated national legislation. 2011. http://tinyurl.com/y4dx8k39 (accessed 28 June 2019)
Hallam C, Weston V, Denton A Development of the UK Vessel Health and Preservation (VHP) framework: a multi-organisational collaborative. J Infect Prev. 2016; 17:(2)65-72 https://doi.org/10.1177/1757177415624752
Health and Safety Executive. Sharp instrument in healthcare regulations 2013: guidance for employers and employees. 2013. http://www.hse.gov.uk/pubns/hsis7.htm (accessed 28 June 2019)
Helm RE, Klausner JD, Klemperer JD, Flint LM, Huang E. Accepted but unacceptable: peripheral IV catheter failure. J Infus Nurs. 2015; 38:(3)189-203 https://doi.org/10.1097/NAN.0000000000000100
Kinlin LM, Mittleman MA, Harris AD, Rubin MA, Fisman DN. Use of gloves and reduction of risk of injury caused by needles or sharp medical devices in healthcare workers: results from a case-crossover study. Infect Control Hosp Epidemiol. 2010; 31:(9)908-917 https://doi.org/10.1086/655839
National Institute for Health and Care Excellence. Intravenous fluid therapy in adults in hospital. 2013. https://www.nice.org.uk/guidance/CG174 (accessed 28 June 2019)
Nursing and Midwifery Council. Standards framework for nursing and midwifery education. 2018b. http://tinyurl.com/yy4mhbyy (accessed 28 June 2019)
Phillips LD, Gorski LA. Manual of IV therapeutics: evidence-based practice for infusion therapy, 6th edn. Philadelphia (PA): FA Davis Company; 2014
Rickard CM, Webster J, Wallis MC Routine versus clinically indicated replacement of peripheral intravenous catheters: a randomised controlled equivalence trial. Lancet. 2012; 380:(9847)1066-1074 https://doi.org/10.1016/S0140-6736(12)61082-4
Royal College of Nursing. Standards for infusion therapy. 2016. http://tinyurl.com/y2le48zm (accessed 28 June 2019)
Thomas RK. Practical medical procedures at a glance.Chichester: John Wiley & Sons; 2015
Wallis MC, McGrail M, Webster J Risk factors for peripheral intravenous catheter failure: a multivariate analysis of data from a randomized controlled trial. Infect Control Hosp Epidemiol. 2014; 35:(1)63-68 https://doi.org/10.1086/674398
Woode Owusu M, Wellington E, Canvin M, Rice B, Ncube F. Bloodborne viruses and workplace injury risk. Nursing Times. 2015; 111:(7)12-14
Intravenous cannulation is a technique that involves the insertion of a fine, flexible hollow tube, with an inner retractable needle, into a peripheral vein. Worldwide, this is the most commonly performed invasive procedure (Boyd, 2013). It provides access for the administration of fluids, medications, dyes, contrast media and blood products, and enables the removal of blood for analysis (Helm et al, 2015).
However, undertaking cannulation carries risks. Therefore, in order to practise safely, it is paramount that health professionals are cognisant of their own limitations, understand the theory underpinning the insertion technique and have an awareness of the risks associated with this clinical skill (Nursing and Midwifery Council (NMC), 2018a).
Informed consent and patient preparation
Where possible, informed consent should be obtained. This will include ensuring that patients are aware of (Dougherty and Lister, 2015):
The reasons for inserting the cannula
Areas where it could be situated
The associated risks
The potential complications
Details of the insertion procedure and aftercare.
Providing this level of information will not only safeguard that the patient can provide valid consent, but it will also assist in building rapport and a trusting therapeutic relationship, that could help reduce any fears or anxieties.
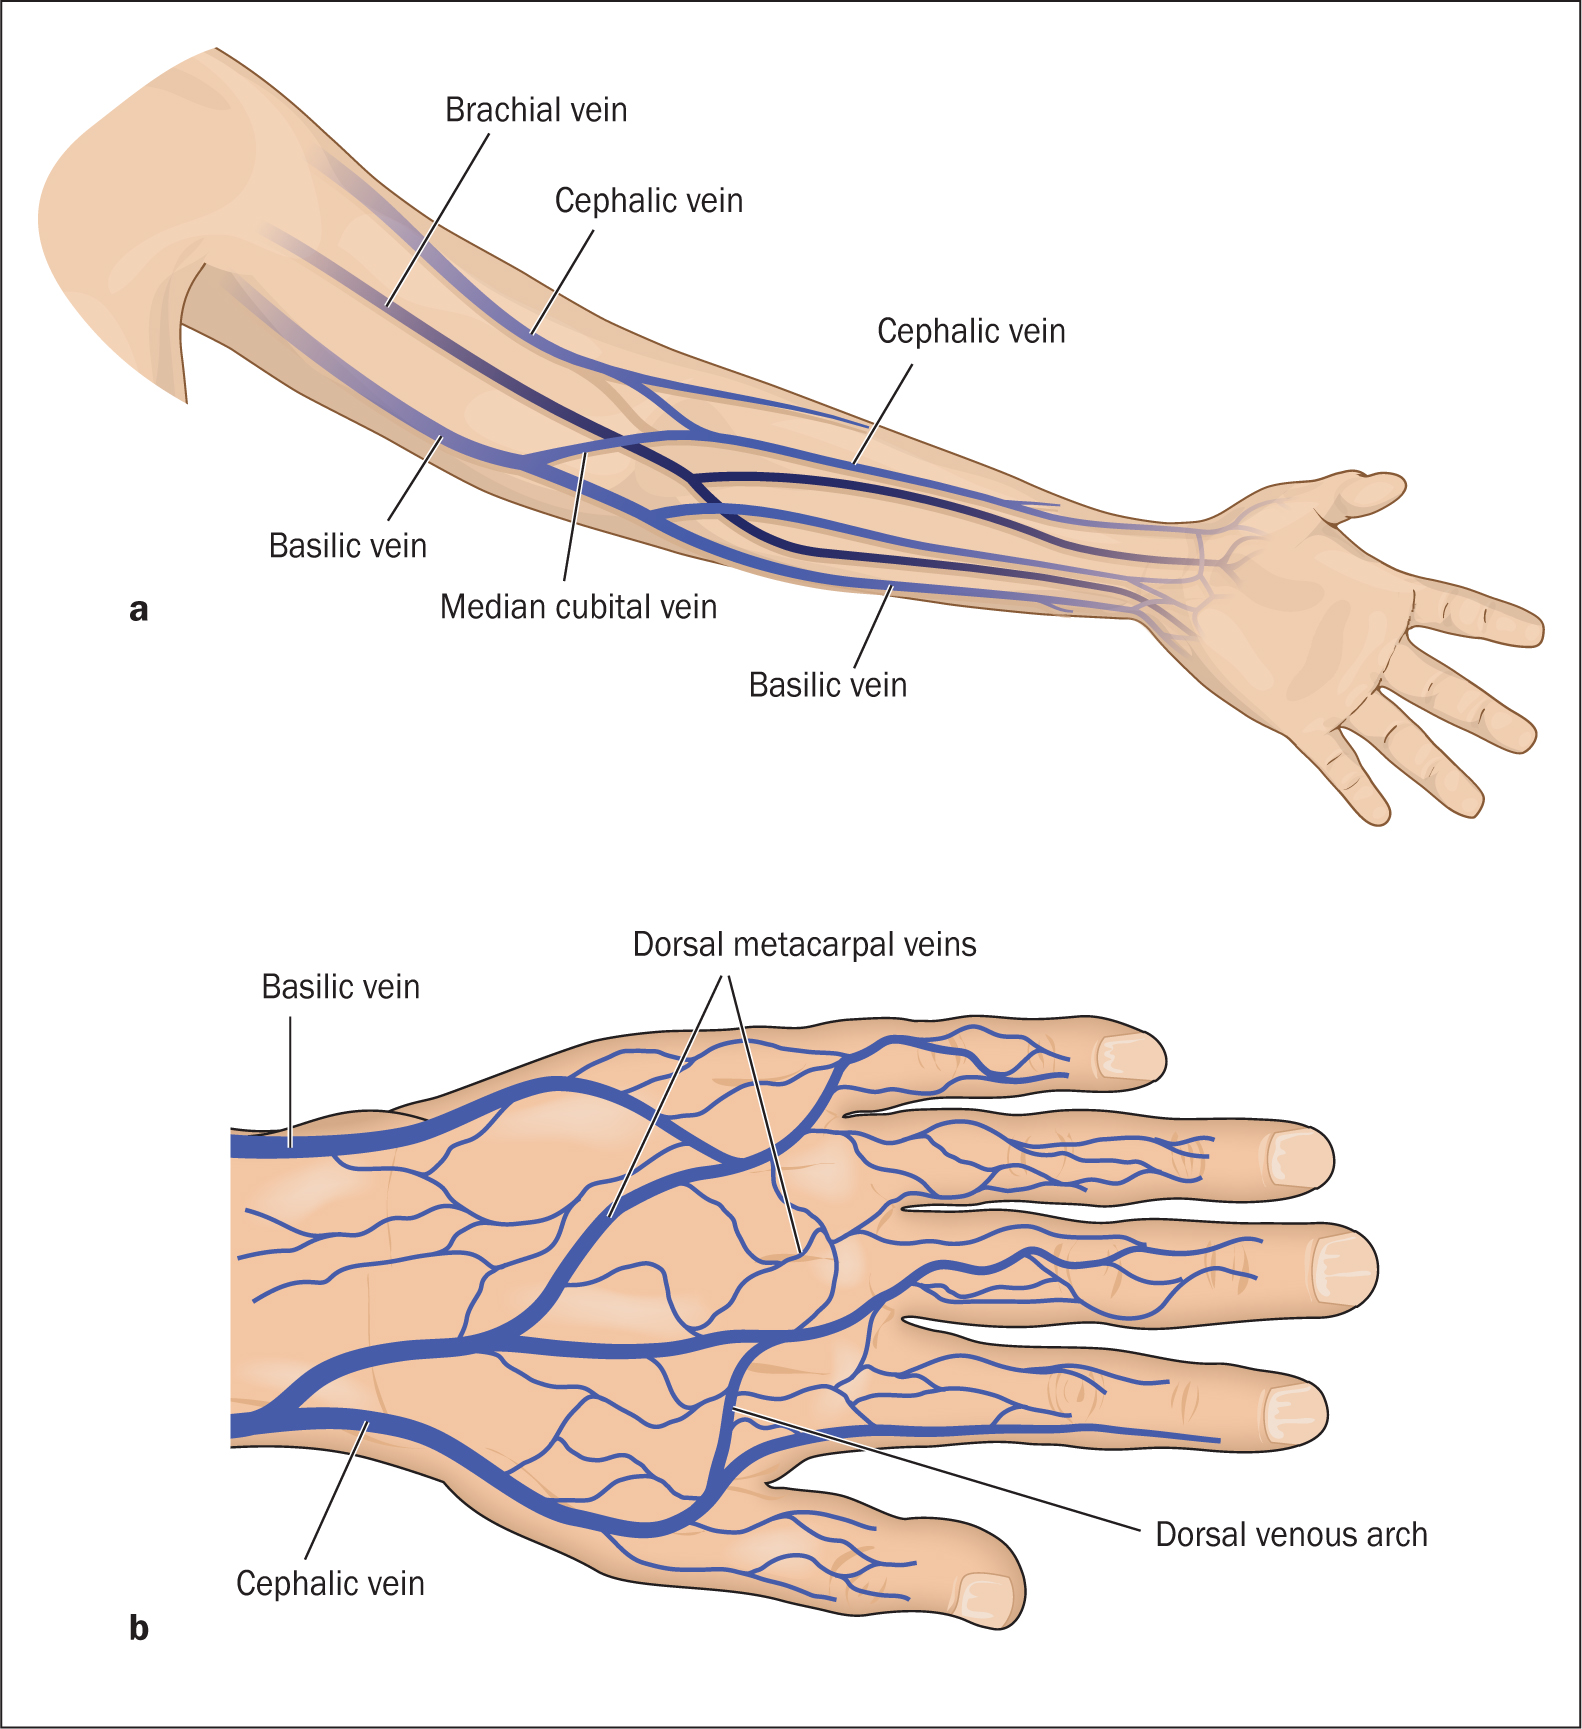
Anatomy of the hand and forearm
Unlike venepuncture, and where possible, the antecubital fossa region should be avoided. This is especially important in the case of cannulas that will be sited for longer periods, because flexion of the arm may impede the ability of the cannula to function correctly and increase the possibility of the cannula becoming occluded. Rickard (2012) agreed that occlusion is one of the most common reasons for cannula failure, which may lead to the patient experiencing unnecessary discomfort if the cannula needs to be removed and re-sited.
It is, therefore, best practice to use the cephalic or basilic veins on the forearm (Figure 1a) or the dorsal metacarpal veins on the back of the hand (Figure 1b) (Thomas, 2015).
Figure 1. The cephalic and basilic veins of the forearm (a) and the dorsal metacarpal veins on the back of the hand (b)
Choosing the correct site, vein and cannula size
The National Institute for Health and Care Excellence (2013) recommends that before insertion of a cannula the health professional undertaking this task needs to make a clinical decision in relation to the site and choice of vein, in order to reduce the risk of cannula failure and associated complications.
The decision should take into consideration the patient's preferences, their level of acuity, vein accessibility, medical history and cannulation history. Sites and veins to avoid include those affected by the patient's clinical condition, for example, if the patient is postmastectomy, using the side associated with breast surgery is contraindicated due to the complications associated with potential lymphoedema development post node removal (Thomas, 2015). Veins that are small, superficial, sclerosed, pulsating or close to arteries should also be avoided, in order to reduce the risks of complications developing during and after the insertion period (Rickard et al, 2012).
Complications can also be avoided by using veins with a larger diameter in the upper extremities and with good capillary refill (Dougherty and Lister, 2015). Factors that would affect the decision for the site and the vein choice are summarised in Box 1.
Choice of site
Veins to use
Veins in upper extremities
Basilic or cephalic on the non-dominant side (if practical)
Veins with larger diameter
Veins closer to the skin
Opposite the surgical site
Use the distal vein first, proximal to previous site
Moreover, in an attempt to improve vessel health, it is vital that health professionals possess knowledge and understanding of alternative vascular access devices, and utilise the vessel health and preservation (VHP) framework, in order to assess whether a peripheral cannula is the most appropriate device to use (Hallam et al, 2016).
If a peripheral cannula is the most suitable vascular access device, then it is important to choose the correct size (length and width) and type (ported or non-ported). Thomas (2015) advocates that health professionals should use the shortest and smallest gauze capable of achieving the required flow rates in order to meet the clinical need. Because there are a vast array of devices available, from several manufacturers, it is also important to take into consideration specific design features (such as wings and ports) when choosing which device to use.
Cannula insertion procedure
In order to carry out the procedure, additional equipment is required (Box 2), all of which should be checked prior to carrying out the procedure. When undertaking the procedure, it is important to:
Communicate with the patient and provide them with relevant information to enable them to provide informed consent. This will also provide you with the opportunity to talk about previous experiences with cannulation, ascertain if the patient has any allergies to dressings, assess for potential complications, and physically prepare the patient and the environment prior to collecting the equipment
Decontaminate hands and, with the patient's arm in a comfortable and appropriate position, apply the tourniquet 7–10 cm above the chosen site. To encourage venous filling and vein distention, ask the patient to open and close their fist; use gravity by asking the patient to hang their arm down, apply a warm compress or lightly stroke the vein in a downward motion (Phillips and Gorski, 2014)
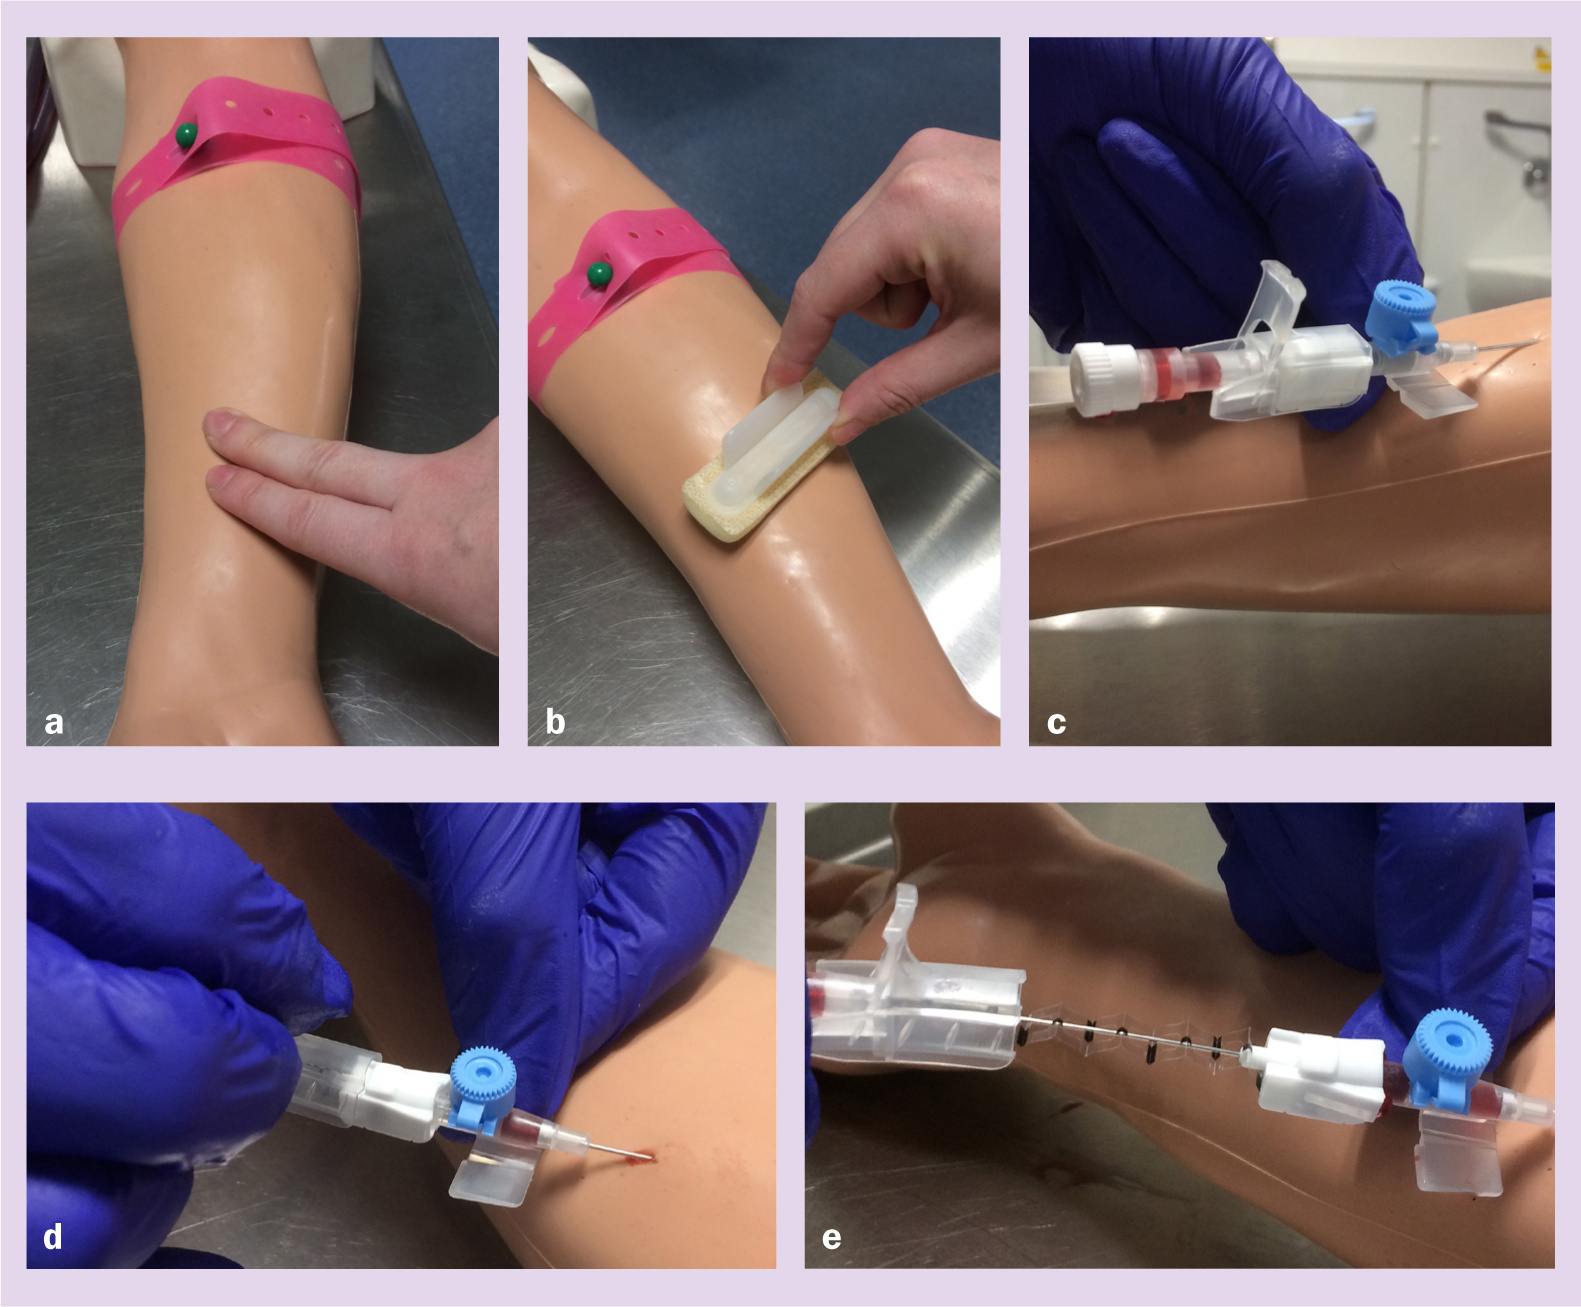
With two fingers, palpate the vein in order to confirm suitability (Figure 2a) and release the tourniquet
Decontaminate hands, clean the tray/receptacle and gather the equipment, ensuring that you check for damage and contamination. Place the equipment into the clean receptacle using aseptic non-touch technique (ANTT) (do not touch the key flushparts—the tip of the cannula and the end of the syringe for flushing)
Reapply the tourniquet; do not overtighten because this may obstruct arterial flow
Clean the chosen site with the alcohol-based preparation equipment (2% chlorhexidine in 70% isopropyl alcohol) (Figure 2b). Ensure that you abide by the manufacturer's application instructions and allow the area to dry for 30 seconds. Do not touch the skin or repalpate the vein after application of the skin preparation (Dougherty and Lister, 2015)
While waiting for the skin preparation solution to dry, decontaminate hands and don gloves
Prepare the cannula device by removing the needle guard and assessing the tip for damage
Next, with your non-dominant hand apply traction to the skin and stabilise the vein below the chosen site. Advise the patient that they will feel a sharp scratch
Insert the cannula at an angle of 20–30° (depending on the manufacturer's instructions), ensuring that the bevel is up, and observe for the first flashback of blood into the cannula (Figure 2c)
Lower the angle of insertion by dropping the cannula closer to the skin and advance the device slightly
Then continue to advance the cannula 2 mm and draw the stylet back 2–3 mm, noting the second flashback in the lumen of the cannula (Figure 2d)
Slide the cannula over the needle, advancing further into the vein. Keeping traction on the skin will make this process easier
Release the tourniquet, apply pressure beyond the cannula tip, loosen the cap at the end of the stylet and withdraw the needle, placing it immediately into the sharps waste container. In line with the Health and Safety Executive (HSE) (2013) regulations, the cannula will have a safety device (active or passive) in place to prevent a sharps injury. Depending on the specific design, it may also have a passive safety feature that prevents the reinsertion of the needle back into the lumen of the cannula, reducing the risk of cannula tip damage (Figure 2e). Reapply the cap before releasing pressure and fix the cannula in place with a semipermeable film dressing
Flush with 0.9% sodium chloride (a cannula after insertion must always be flushed, irrespective of whether it is integrated or has an extension; the procedure for how this is undertaken will differ, ie the extension must also be primed)
Dispose of waste, remove personal protective equipment and decontaminate hands using the appropriate technique (Ford and Park, 2018; 2019)
Document your care (via paper-based or electronic platforms) according to trust guidelines and protocols. This should include, as a minimum standard, your signature, date and designation, the time, cannula size, site of insertion, the number of insertion attempts, and any noted insertion complications. Further documentation, such as the visual infusion phlebitis (VIP) score, may also need to be completed, depending on trust requirements.
Figure 2. Correct procedure for inserting a cannula
Risks and hazards
Research by Wallis et al (2014) and Helm et al (2015) suggested that catheter-related failure complication rates vary between 35% and 50%. These can be avoided if health professionals adhere to sound infection control and prevention precautions, choose the right vessel, use correct insertion techniques, and have an awareness of anatomy (Dougherty and Lister, 2015).
Additionally, as with any clinical procedure, the appropriately trained person must be aware of the risks involved, not only for themselves but also for the patient and others.
Safety of the practitioner
One of the greatest dangers to health professionals when undertaking procedures using hollow-bore needles is the risk of contracting a blood-borne infection via a sharps injury (HSE, 2013). Due to the frequency with which nurses undertake cannulation, they are one of the health professional groups at greatest risk (Woode Owusu, 2015).
Health professionals can be exposed to 30 potentially dangerous pathogens, including hepatitis B and C (European Biosafe Network, 2011). Therefore, in order to ensure safe practice, personal protective equipment, which is a universal precaution, must be worn. Kinlin et al (2010) claimed that the use of gloves has been shown to be beneficial in reducing the transmission of blood-borne infections by decreasing the inoculum of blood introduced during a sharps injury.
Additionally, all devices used must adhere to sharps safety regulations, must be checked before use, used as instructed by manufacturers and disposed of correctly (HSE, 2013).
Safety of the patient
The risks of inserting a foreign object into a patient's arm must be considered, especially in relation to the risk of complications, such as infection, haematoma, arterial puncture and nerve injury, and what steps must be taken if they occur (Buowari, 2013).
Nerve injury: this can occur through poor vein choice and often results in shooting or burning pain, or sharp tingling. If this occurs, the needle and tourniquet must be removed
Haematoma: infiltration of blood into the surrounding tissues is often caused by poor insertion technique, inappropriate vein selection, inadequate pressure upon removal, incorrect use of the tourniquet, or a cannula size that is too large for the chosen vein. The risk of this occurring is increased in a patient who is receiving anticoagulant therapy
Arterial puncture: the inadvertent puncture of an artery rather than a vein can occur if there has been an inadequate assessment of the site and if the vein chosen is very close to an artery. This can result in the formation of a haematoma and other symptoms such as numbness, pain, and paleness and coldness of the limb or hand. If an arterial puncture occurs, remove the cannula, apply pressure and raise the patient's arm.
Post-insertion complications
Phlebitis: this is defined as irritation or inflammation of the vein caused by chemical, mechanical or biological means. Patients can display a range of symptoms, which can include localised pain, oedema and erythema. If this occurs, and depending on the VIP score, the cannula may need to be removed and re-sited. To aid with the discomfort and swelling the patient can experience, a warm or cold compress can be applied
Thrombus: in some cases, a thrombus may develop within a vein that has been used for cannulation. A thrombus can also occur secondary to phlebitis (thrombophlebitis), and it may be necessary to remove and resite as per the VIP protocol
Infiltration: this relates to the administration of non-vesicant medication and fluids into the adjacent tissue rather than the vein (Phillips and Gorski, 2014). The severity of the complications is usually graded using the infiltration scale, and close monitoring of the patient, cannula site and surrounding tissue will be needed, to assess deterioration or improvement. The VIP score will also need to be recorded
Extravasation: this complication is defined as the administration of vesicant intravenous fluids or medications into adjacent tissues rather than into the vein, which subsequently leads to blistering and possible tissue necrosis (Phillips and Gorski, 2014). Immediate signs include a slowed infusion rate, pain, oedema and skin blanching. If extravasation occurs, the infusion of fluid or medication must be stopped immediately and advice sought in relation to whether the fluid or medication needs to be aspirated. In some cases, the cannula will, therefore, need to remain in situ for aspiration and antidote administration to occur. As in the case of phlebitis, a warm or cold compress might be beneficial, and limb elevation may be required due to oedema
Air embolism: this occurs when air or gas is admitted, iatrogenically, into the vascular or arterial system and, while it is rare, it can be fatal. In the case of cannulation, it can be avoided by the correct priming of the fluid administration set so that no air enters the bloodstream. Signs and symptoms include tachypnea, reduced oxygen saturations, hypotension, tachycardia and chest pain.
Top tips
The following information has been collated by Northumbria University staff in relation to some of the common errors that students encounter when undertaking cannulation in clinical practice.
Missed vein: ensure that you use your fingers to anchor the vein below the intended insertion point, because this will prevent the vein from moving and ensure easier entry. Also, spend time assessing the site and locating the most optimal vein. If you choose one of the largest veins, then the likelihood of missing the vein will be reduced
For veins that are difficult to locate, use additional assistive technologies such as vein location tools and ultrasound, which can be used with assistance from a trained operator
If blood is required for analysis, this must be taken prior to the administration of any medication. Please refer to the associated article ‘Venepuncture in adults' (Skarparis and Ford, 2018), for further details on the procedure for taking blood
Consider whether a peripheral cannula is the best device for the delivery of fluids and medications. Utilise the vessel health preservation (VHP) framework and continually re-evaluate vessel health (Hallam et al, 2016).
Conclusion
Cannulation is a clinical skill that requires health professionals to have a sound understanding of the underpinning principles, as well as a comprehensive awareness of the technique aligned with the clinical procedure. Therefore, while it is important to review local and national guidelines and the associated literature, it is also vital that nurses use every opportunity to practise this skill in clinical practice, in addition to using alternative education and learning strategies, such as simulation training aids, in order to ensure that their practice is up to date (NMC, 2018b).
KEY POINTS
Increase knowledge of the anatomy of the arm and hand
Understand the importance of selecting an appropriate site for performing cannulation on an adult
Be aware of the equipment required to perform the procedure and ensure it is to hand before starting cannulation
Recognise the dangers and potential complications of this invasive technique, including the risks to the practitioner