References

Allan J, Sheppard K. Monitoring a pulse in adults. Br J Nurs. 2018; 27:(21)1237-1239 https://doi.org/10.12968/bjon.2018.27.21.1237

British and Irish Hypertension Society. Blood pressure measurement. Using manual blood pressure monitors. 2017. https://tinyurl.com/ybz44moe (accessed 9 January 2019)

Dougherty L, Lister S. The Royal Marsden manual of clinical nursing procedures, 9th edn. Chichester: Wiley Blackwell; 2015

Fetzer SJ. Vital signs and physical assessment, 8th edn. In: Perry AG, Potter PA, Ostendorf WR (eds). St Louis. MO: Mosby; 2014

Foley V. Clinical measurement. In: Delves-Yates C (ed). London: SAGE Publications; 2015

Ford C, Park LJ. Hand hygiene and handwashing: key to preventing the transfer of pathogens. Br J Nurs. 2018; 27:(20)1164-1166 https://doi.org/10.12968/bjon.2018.27.20.1164

Ford C, Park LJ. How to apply and remove medical gloves. Br J Nurs. 2019; 28:(1)26-28 https://doi.org/10.12968/bjon.2019.28.1.26

James GD, Gerber LM. Measuring arterial blood pressure in humans: auscultatory and automatic measurement techniques for human biological field studies. Am J Hum Biol. 2018; 30:(1) https://doi.org/10.1002/ajhb.23063

Lancaster RJ, Westphal J, Jambunathan J. Using SBAR to promote clinical judgment in undergraduate nursing students. J Nurs Educ. 2015; 54:(3)S31-S34 https://doi.org/10.3928/01484834-20150218-08

Levick JR. An introduction to cardiovascular physiology, 5th edn. London: Hodder Arnold; 2010

Moore T. Observations and monitoring vital signs. In: Moore T, Cunningham S (eds). Abingdon: Routledge; 2017

National Institute for Health and Care Excellence. Hypertension in adults: diagnosis and management. 2011. https://tinyurl.com/z7shd55 (accessed 9 January 2019)

Nursing and Midwifery Council. Future nurse: standards of proficiency for registered nurses. 2018. https://tinyurl.com/yaln93xh (accessed 9 January 2019)

O'Brien EO. Blood pressure measurement, 6th edn. In: Beevers DG, Lip GYH, O'Brien E (eds). Chichester: Wiley Blackwell; 2015

Odell M. Chapter 3. Recognizing and managing the critically ill and ‘at risk’ patient on a ward. In: Mallett J, Albarran JW, Richardson A (eds). Chichester: Wiley Blackwell; 2013

Tanner CA. Thinking like a nurse: a research-based model of clinical judgment in nursing. J Nurs Educ. 2006; 45:(6)204-211

Tomlinson BU. Accurately measuring blood pressure: factors that contribute to false measurements. Medsurg Nurs. 2010; 19:(2)90-94

Wallymahmed M. Blood pressure measurement. Nurs Stand. 2008; 22:(19)45-48 https://doi.org/10.7748/ns2008.01.22.19.45.c6314

Watson F, Rebair A. The art of noticing: essential to nursing practice. Br J Nurs. 2014; 23:(10)514-517 https://doi.org/10.12968/bjon.2014.23.10.514

How to take manual blood pressure

24 January 2019
Volume 28 · Issue 2

This article focuses on non-invasive blood pressure (BP) measurement, using the manual technique. This vital observation is practised by all nursing fields in primary and secondary healthcare environments.

What is blood pressure?

A BP measurement in its simplest form is a determinant of individual cardiac output (the volume of blood pumped out of the heart and into the aorta per minute) and the systematic vascular resistance (the diameter of the arterial blood vessels) (Foley, 2015).

BP measurement is widely recognised as being a routine observation that can be used as a way to assess cardiac output and its effectiveness for adequate tissue perfusion (Odell, 2013). Thus, the presence of a BP is a requirement for human existence and BP measurement, which includes interpreting results and taking appropriate action, is considered a key clinical skill to acquire and maintain as results can determine patient care (Doughty and Lister, 2015).

Many factors can influence a BP reading, for example, age, sleep, emotions and activity. Consequently, evidence in the literature varies as to what constitutes a normal reading, and optimal parameters are often used instead (Moore, 2017). Dougherty and Lister (2015) state that the normal BP at rest has the range of 110–140 mmHg for systolic and 70–80 mmHg for diastolic BP.

Hypertension (high BP) refers to measurements that exceed the resting systolic parameters and hypotension (low BP) refers to those that fall below resting systolic parameters. Hypertension and hypotension, if left undetected and unmanaged, can have serious implications for an individual, including reduced tissue perfusion if hypotensive and cardiac ischaemia if hypertensive (Wallymahmed, 2008).

BP measurement consists of two readings, which are recorded like a fraction, with one reading on top and the other below, i.e. 120/80 mmHg (Box 1) (Moore, 2017). The uppermost reading, known as the systolic, is the first to be taken: it measures the peak force of blood as it pushes against the walls of the arteries as the heart's left ventricle contracts, pushing blood into the aorta and causing an increase in pressure (Fetzer, 2014; Foley, 2015). The lower reading, the diastolic, measures the force exerted on the walls of the arteries as the heart relaxes and refills.

Blood pressure basics

  • Blood pressure can be obtained manually, via electronic methods and invasively
  • Blood pressure is measured in millimetres of mercury (mmHg)
  • A blood pressure reading is calculated by obtaining a systolic and diastolic reading and is recorded similar to a fraction, one reading over another, i.e. 120/80 mmHg:
  • Systolic120
    Diastolic80

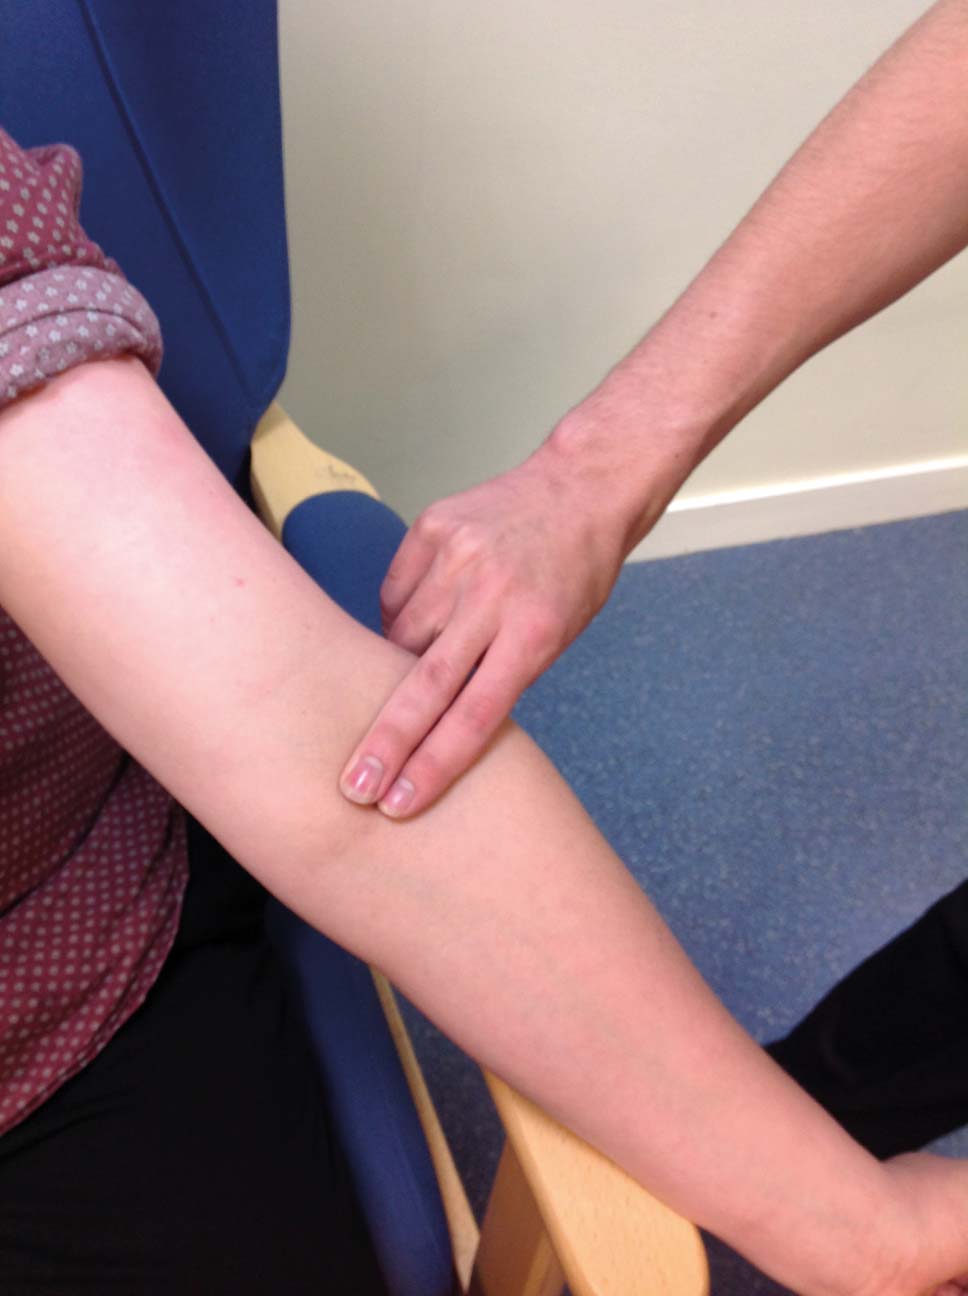
    Different arteries can be used to measure BP. However, due to ease of access, the manual technique is generally associated with measuring brachial arterial pressure, a major blood vessel that runs through the upper arms before dividing below the anticubital fossa.

    What is involved in taking a manual BP?

    Two main pieces of equipment are required to take a manual BP: an aneroid sphygmomanometer and a stethoscope (Figure 1a and Figure 1b).

    Figure 1. An aneroid sphygmomanometer (a) and stethoscope (b)

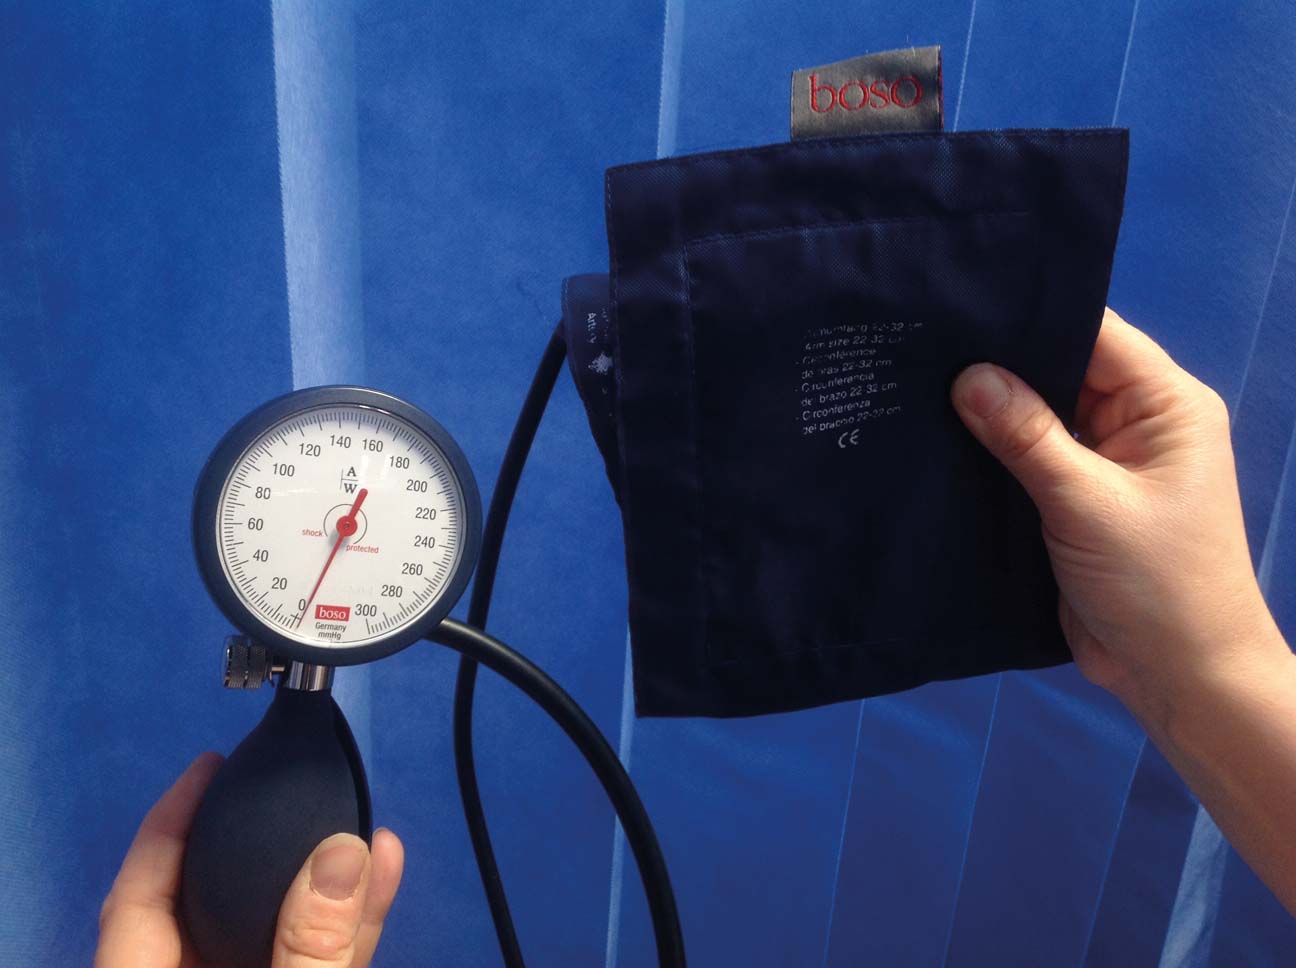
    The sphygmomanometer consists of a cuff that houses an inflatable bladder, a manometer (dial) and a mechanism to pump up the cuff, known as the inflation bulb. Measurement of BP involves:

  • Depressing the inflation bulb, forcing the air inside into the bladder in the cuff
  • Releasing the bulb, allowing air to re-enter the bulb
  • The process is then repeated.
  • The following occurs during this process: the pressure in the bladder situated within the cuff fills to a point where pressure within the cuff exceeds the blood flow in the brachial artery. The cuff, therefore, acts like a tourniquet, by temporarily excluding blood flow to the artery. Opening the valve attached to the inflation bulb slowly releases air from the bladder, the cuff pressure falls and, when the systolic pressure becomes greater than the pressure remaining in the cuff, a sound will be heard through the stethoscope (Levick, 2010).

    The sounds that can be heard are referred to as Korotkoff sounds; these can often be described either as a faint tapping, thudding or ticking sound — it is the first Korotkoff sound (Table 1) that is used to determine the systolic reading (Foley, 2015). As air continues to be released from the bladder, pressure in the cuff decreases further, reducing restrictions on the arteries, the blood flow starts to return to normal and the Korotkoff sounds disappear, indicating the diastolic reading (Fetzer, 2014).


    Silence will be heard before cuff inflation. Sounds will be heard only when Phase I starts
    Phase I First tapping, thudding sound (volume and clarity of sound vary between patients)
    Phase II Sounds change to a murmur and can be distinguished as a swishing sound
    Phase III The sounds in phase III are louder than phase I and are distinguished as knocking sounds
    Phase IV Sounds become muffled as pressure in the cuff decreases. They can again be distinguished as swishing sounds
    Phase V Silence

    Source: Dougherty and Lister, 2015

    Electronic versus manual devices

    While the manual auscultation technique is considered the gold standard for BP measurement, advances in medical technology have resulted in alternative ways of measuring and monitoring BP (James and Gerber, 2018).

    The Nursing and Midwifery Council (2018) and the National Institute for Health and Care Excellence (NICE) (2011) advocate the use of either manual or technological devices, with neither option being favoured over the other. However, there are advantages and disadvantages to both methods—a level of clinical knowledge and skills for manual and electronic measurements are requirements within clinical practice. Moreover, while electronic devices have become the ‘go to method’, it is essential that nurses maintain the skills and confidence in using the manual method (Moore, 2017), especially for patients with hypertension, hypotension or pulse irregularities. Pulse irregularities can cause inaccuracies in electronic readings (NICE, 2011; Foley, 2015) and this can lead to false diagnosis and incorrect treatment.

    In addition, if there are any doubts over an electronic BP reading, a manual reading should be obtained to verify BP (Dougherty and Lister, 2015). Using clinical judgement when doubts arise is often associated with the art of noticing (Tanner, 2006; Watson and Rebair, 2014: Lancaster et al, 2015). Failure to interpret and, ultimately, respond appropriately to clinical cues to uncover clinical signs of deterioration linked to changes in BP can have serious consequences (Watson and Rebair, 2014; Lancaster et al, 2015).

    How to take a manual BP

    Poor technique is another factor that can lead to inaccuracies in BP measurements. It is therefore important to follow the correct technique (Dougherty and Lister, 2015; O'Brien, 2015; Moore, 2017; British and Irish Hypertension Society, 2017):

  • Ensure you adhere to infection prevention (i.e. hand hygiene, personal protective equipment (PPE), decontaminate equipment) (Ford and Park, 2018; 2019)
  • Communicate with the patient, explain the procedure fully, check their understanding and gain consent. Check if they have a preference for which arm to use. Ask them to remove any clothing covering the arm
  • Position your patient (i.e. supine, seated or standing) and choose an appropriate arm from which to take the BP reading (i.e. avoid fistulas, broken areas of skin, mastectomy sites and cannula sites)
  • Gather, check and prepare the equipment. All BP devices should be checked and calibrated according to the manufacturers' instructions (i.e. check for damage, and check that the dial is at zero). (Not checking or calibrating the equipment can lead to inaccuracies)
  • Ensure the cuff size is correct for the patient. If it is too large, the BP reading can be underestimated. Cuff sizes are often displayed in picture form on the outside of the cuff (Figure 2)
  • Ensure the stethoscope is in full working order: this will require you to twist the head clockwise and gently tap on the diaphragm. If a loud sound can be heard, the stethoscope is working correctly
  • Locate the patient's brachial artery (Figure 3a) (Allan and Sheppard, 2018)
  • Wrap the cuff securely around the patient's bare arm, ensuring that the patient side of the cuff is placed against their skin, with the cuff 's lower edges 2–3 cm above the brachial pulse. The cuffed arm should be at the level of the patient's heart to ensure an accurate reading (a pillow can be used to position the arm if required)
  • Ensure the patient is rested (the person should be seated comfortably for at least 5 minutes before taking a BP), and ask them not to talk or eat. Ensure their legs are uncrossed (crossed legs can increase blood pressure)
  • Relocate the brachial pulse; once found, palpate the pulse while inflating the cuff. When the brachial pulse can no longer be felt, deflate the cuff, ensuring that you take note of the reading on the manometer (dial). To estimate the systolic pressure add 20 mmHg to the measurement you recorded; this is known as the patient's approximate systolic BP. Gaining an approximate systolic is considered good practice: it assists in estimating (the approximate pressure when you should hear Phase I of the Korotkoff sounds (the systolic reading), thus reducing the risk of the systolic reading being missed
  • Place the stethoscope into your ears, with the earbuds facing forward, and position the diaphragm of the stethoscope over the patient's brachial pulse (Figure 3b)
  • Inflate the cuff to the approximate systolic previously noted
  • Slowly deflate the cuff by 2–3 mmHg per second, while simultaneously listening for the first Korotkoff sound (tapping sound that identifies the systolic reading) and the Korotkoff disappearing (this signifies the diastolic reading) (Table 1)
  • Once Korotkoff sounds can no longer be heard, open the valve to deflate the cuff fully. If you need to re-check the BP, ensure you wait 1-2 minutes
  • Remove the cuff, decontaminate the equipment and document the readings.
  • Figure 2. The size is often shown on the BP cuff
    Figure 3. Locate patients' brachial artery (a) and position the diaphragm of the stethoscope over the patient's brachial pulse

    Common causes of error

    Top tips for using a stethoscope

    Inaccuracies with the readings often result from reduced hearing, which can be caused by the incorrect opening of the diaphragm of the stethoscope and incorrect insertion of the earpieces (i.e. being placed in the ear canal in the wrong direction) (Wallymahmed, 2008; Tomlinson, 2010; Dougherty and Lister, 2015):

  • Before inserting the stethoscope make sure that the earpieces are pointing forward towards the bridge of your nose
  • Once the stethoscope is in situ, check that the diaphragm is open by tapping its surface area gently. If a loud sound can be heard, it is working correctly. If no sound can be heard, turn the stethoscope head 180° and repeat the process
  • Some stethoscopes have dual auscultation devices (diaphragm and bell). The diaphragm is identified by its flat, larger surface area, which makes it easier to control when using it one handed
  • Ensure the diaphragm, not the bell, is placed over the brachial artery.
  • Tops tips for cuff application

    Loose and incorrectly placed cuffs are a common problem associated with inaccurate BP measurements. So ensure that:

  • The midline of the bladder is placed 2–3 cm above the brachial pulse. Most cuffs now have an arrow to indicate the midline point. This needs to point down toward the brachial (Figure 4a and Figure 4b)
  • The cuff is secured so it is comfortable and cannot slip off the patient's arm.
  • Figure 4. Position the stethoscope over the patient's brachial pulse

    Tops tips for using the valve on the inflatable bulb and reading the measurements on the dial

    Opening, closing and controlling the valve, in particular the speed, are common problems that lead to inaccurate readings. This can be avoided, so:

  • Before carrying out the procedure, confirm in which direction the valve is opened and closed
  • Opening and closing the value slowly comes with practice. Practising a one-handed technique for slowly opening and closing the valve is essential
  • Ensure that the sphygmomanometer is placed at eye level and that the dial on the meter is visible.
  • LEARNING OUTCOMES

  • Understand the reasons for taking blood pressure (BP) and the equipment required
  • Understand the various techniques for taking BP measurements
  • Recognise the procedural steps for taking a manual BP
  • Be aware of common causes of errors when taking a manual BP